Settings
JourneyMap provides more than a few configuration options, allowing you to customize the behaviour and appearance of many different aspects of the mod. All of these settings are made available through the settings manager.
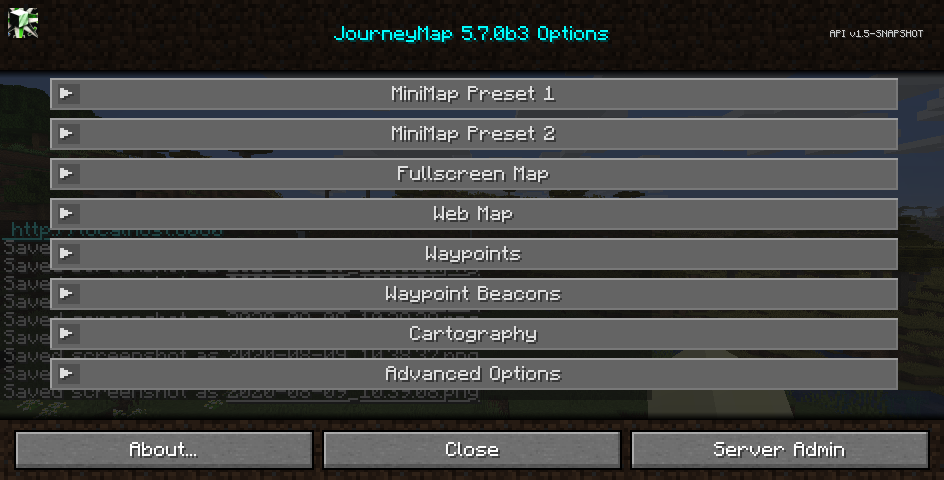
To get to the settings manager, open the full-screen map and click the settings button at the bottom, or press the O key. Each entry in the list represents a specific category of settings - click on it to expand and see the settings within.
Note
Each category has a Reset button. Please note that pressing this button will reset the settings in that category to the default settings bundled with JourneyMap, instead of simply discarding your changes.
Some of these categories have quite a few settings. Feel free to skip to a specific category by clicking on one of the links below.
Grid Settings
Both minimap presets and the full-screen map may have a configurable grid overlay. You can customize this overlay by clicking on the Edit Grid… button below the settings in each respective category.
You can also reach this from the full-screen map by holding the Shift key and clicking on the grid button at the top.
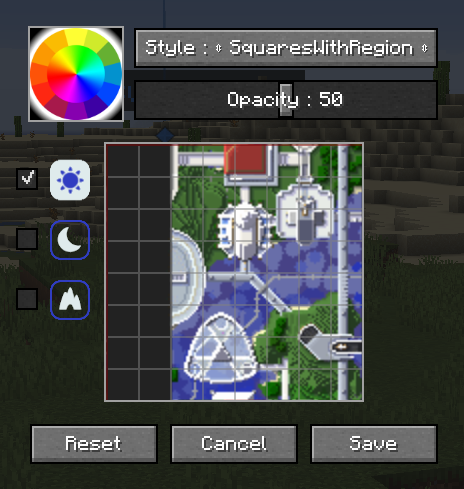
The grid outlines individual chunks on the map. Grid styles that include region lines will draw an extra grid with differently-coloured lines to outline world regions on the map.
- Select a colour for the grid lines by clicking on the colour wheel.
- Select the map type (day, night or caves) to edit on the left side.
- Click the Reset button to reset the current map type to the default grid settings.
- Click the Cancel button to discard your changes and close the grid editor.
- Click the Save button to save your changes and close the grid editor.
| Setting | Options | Description |
|---|---|---|
| Style |
|
Change the type of grid overlaid on the map |
| Opacity | Percentage: (default: 50) | How opaque the grid should be drawn |
Minimap Settings
JourneyMap allows you to have two minimap presets. Each preset represents a separate set of settings - essentially allowing you to have two distinct minimaps available to switch between.
Note
The settings for each minimap are identical, so we’ll only cover a single preset below.
To switch between minimap presets, press the switch minimap preset key (the # key by default).
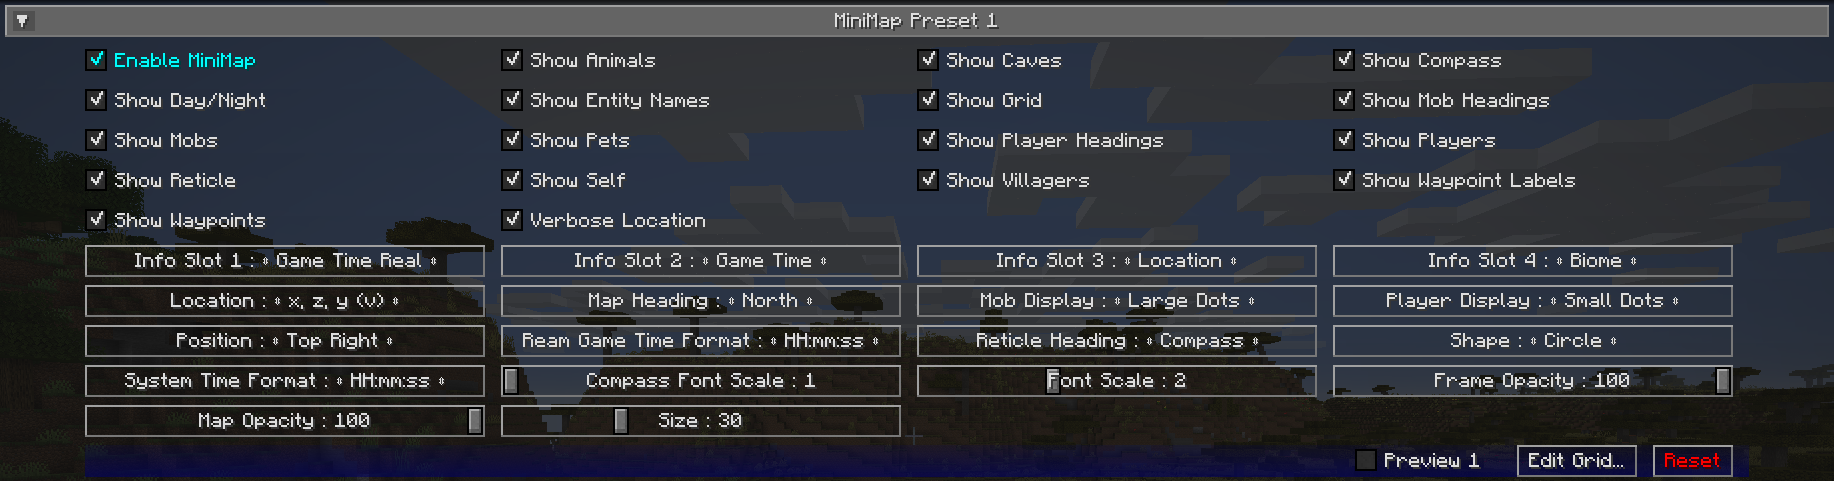
Toggles
By default, all of the following toggle settings are enabled.
| Toggle | Description |
|---|---|
| Enable Minimap | Enable or disable this minimap preset |
| Show Animals | Show or hide animals |
| Show Caves | Toggle automatically switching to cave mode |
| Show Compass | Toggle showing compass points around the edge of the minimap |
| Show Day/Night | Toggle automatically switching between day and night mode |
| Show Entity Names | Show or hide entity names |
| Show Grid | Show or hide the grid overlay |
| Show Mob Headings | Toggle showing which way mobs are facing |
| Show Mobs | Show or hide mobs |
| Show Pets | Show or hide pets |
| Show Player Headings | Toggle showing which way other players are facing |
| Show Players | Show or hide other players |
| Show Reticle | Show or hide midpoint lines pointing to the center of the minimap |
| Show Self | Show or hide your own location and heading |
| Show Villagers | Show or hide villagers |
| Show Waypoint Labels | Show or hide the names of waypoints |
| Show Waypoints | Show or hide all waypoints |
| Verbose Location | Toggle between a long or short form of your current coordinates |
Info Slots
Info slots are text areas above and below the minimap that show extra contextual information. There are four of them, numbered from top to bottom.
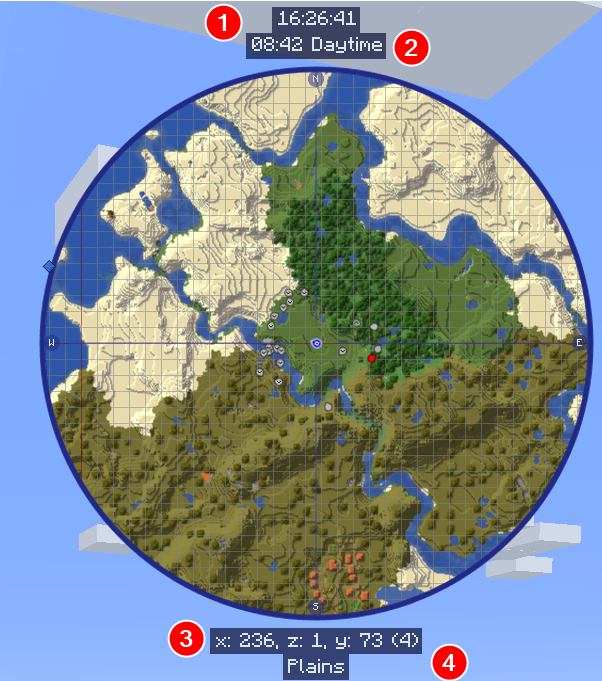
All info slots can be set to one of the following:
- Blank: Nothing, hide this info slot
- Biome: The biome you’re currently in
- Dimension: The dimension you’re currently in
- FPS: The game’s FPS counter
- Game Time: The current ingame time, as represented by Minecraft’s daylight cycle
- Game Time Real: The current ingame time, shifted to match a real clock
- Light Level: The light level of the block you’re standing in
- Location: Your current coordinates
- Region: Your current region coordinates
- System Time: The current real time, according to your computer
Other Settings
The default option for each setting below is marked with bold text.
| Setting | Options | Description |
|---|---|---|
| Location |
|
The format of your coordinates, as shown in an info slot |
| Map Heading |
|
Which direction the top of the map should face - Note: only circle maps support the “My Heading” setting |
| Mob Display |
|
How mobs should be displayed on the minimap |
| Player Display |
|
How other players should be displayed on the minimap |
| Position |
|
The location of the minimap on your screen |
| Real Game Time Format |
|
The text format of the real game time, as shown in an info slot
|
| Reticle Heading |
|
Change the orientation of the reticle |
| Shape |
|
Change the shape of the minimap |
| System Time Format |
|
The text format of the system time, as shown in an info slot
|
| Compass Font Scale | Range: 1 - 4 | How large the compass text should be relative to the GUI scale setting |
| Font Scale | Range: 1 - 4 | How large the info slot text should be relative to the GUI scale setting |
| Frame Opacity | Percentage, default: 100% | How opaque the frame around the outside of the minimap should be |
| Map Opacity | Percentage, default: 100% | How opaque the map view itself should be |
| Size | Percentage, default: 30% | How large the minimap should be, as a percentage of the window size |
Full-Screen Map Settings
The full-screen map provides a large, scrollable view of your entire map. Just like the minimap presets, it can be customized to a great deal.
To switch open the full-screen map, press the full-screen map key (the J key by default).

Note
A handful of the following options are also available as buttons on the full-screen map view itself. For more information on this, please see the full-screen map page.
Toggles
By default, all of the following toggle settings are enabled.
| Toggle | Description |
|---|---|
| Show Animals | Show or hide animals |
| Show Caves | Toggle automatically switching to cave mode |
| Show Entity Names | Show or hide entity names |
| Show Grid | Show or hide the grid overlay |
| Show Keys | Show or hide the keybind list |
| Show Mob Headings | Toggle showing which way mobs are facing |
| Show Mobs | Show or hide mobs |
| Show Pets | Show or hide pets |
| Show Player Headings | Toggle showing which way other players are facing |
| Show Players | Show or hide other players |
| Show Self | Show or hide your own location and heading |
| Show Villagers | Show or hide villagers |
| Show Waypoint Labels | Show or hide the names of waypoints |
| Show Waypoints | Show or hide all waypoints |
| Verbose Location | Toggle between a long or short form of your current coordinates |
Other Settings
The default option for each setting below is marked with bold text.
| Setting | Options | Description |
|---|---|---|
| Location |
|
The format of your coordinates, as shown on the map |
| Mob Display |
|
How mobs should be displayed on the map |
| Player Display |
|
How other players should be displayed on the map |
| UI Theme |
|
Change the theme of the buttons around the fullscreen map - Note: If you have extra themes installed, there will be more to toggle through than shown here |
| Font Scale | Range: 1 - 4 | How large the text should be relative to the GUI scale setting |
Webmap Settings
The webmap is an entirely different way to view your map - in a web browser instead of from directly within Minecraft. This allows you to have a map view visible on another screen, or even another device!

Important
There are a lot of settings in this category that don’t do anything at the moment. Instead, the webmap is configured using its own interface - see the webmap page for more information on this.
Because of this, only the settings that actually do anything are documented below.
Toggles
By default, none of the following toggle settings are enabled. You will need to enable the webmap before you can use it.
| Toggle | Description |
|---|---|
| Enable Web Map | Whether the webmap should be enabled and accessible |
Note
While there is an input to provide a port for the webmap to use,
it is currently ignored. JourneyMap will attempt to use port
8080 by default - if that isn’t available, it’ll attempt
to find a port that is.
The correct port is always shown in chat when the webmap is enabled.
Waypoint Settings
This category allows you to change some settings relating to how waypoints behave and are displayed. Waypoints also have a number of individual settings - you can find out about those on the waypoints page.

Toggles
The bold toggle settings below are enabled by default.
| Toggle | Description |
|---|---|
| Enable Waypoint Manager | Enable the waypoint manager - you can disable this if you use another mod to manage waypoints |
| Auto Remove Death Waypoints | Whether death waypoints should be removed when you approach them |
| Create Deathpoints | Whether death waypoints should be created when you die |
| Display Death Waypoint Label on map overlay | Whether to show the name for death waypoints on your minimap and full-screen map |
Other Settings
The default option for each setting below is marked with bold text.
| Setting | Options | Description |
|---|---|---|
| Custom Waypoint Teleport Command | Text input: /tp {name} {x} {y} {z} | The teleport command that should be used when you teleport to a waypoint, using the following placeholders:
This setting is ignored in single player or if JourneyMap is installed on a server; teleportation happens without a command in that case. |
| Death Date Format |
|
The text format of the date of death, as shown in the death waypoint label
|
| Death Time Format |
|
The text format of the time of death, as shown in the death waypoint label
|
| Auto Remove Death Waypoint Distance | Range: 2 - 64 (in blocks) | How close you need to be to a death waypoint for it to be deleted automatically, if Auto Remove Death Waypoints is enabled |
| Maximum Distance | Range: 0 - 10,000 (in blocks) | How far away you need to be from a waypoint for it to be displayed, including in the world, on the minimap and the full-screen map |
Waypoint Beacon Settings
By default, waypoints are displayed in the world using a beacon beam in the distance, which allows you to see where they are from anywhere in the world. By default, you can look towards the beam and see the waypoint’s icon and label as well. This behaviour can be customized below.
Toggles
The bold toggle settings below are enabled by default.
| Toggle | Description |
|---|---|
| Enable Waypoint Beacons | Toggle whether waypoint beacons are visible |
| Auto-Hide Label | Whether waypoint labels should be hidden until you look at them |
| Bold Label | Whether waypoint labels should be displayed with bold text |
| Rotating Beam | Whether to show a rotating outer beam for the waypoint beacon |
| Show Distance | Whether to show how far away you are from the waypoint on its label |
| Show Icon | Whether to show the waypoint icon |
| Show Name | Whether to show the waypoint name on its label |
| Small Icon | Whether the waypoint icon should be small |
| Stationary Beam | Whether to show a stationary inner beam for the waypoint beacon |
Other Settings
The default option for each setting below is marked with bold text.
| Setting | Options | Description |
|---|---|---|
| Font Scale | Range: 1 - 4 | How large the label text should be relative to the GUI scale setting |
| Minimum Distance | Range: 0 - 64 (in blocks, default: 4) | How far away you need to be from a waypoint for its beacon to be displayed |
Cartography Settings
The cartography settings allow you to customize precisely how JourneyMap generates the map from world data. You can change how some things look here, and you can also tweak various performance-related options.

This screen also displays render statistics - specifically the number of chunks that were rendered during the last render pass, and how long it took. You can use this as a performance metric for when you’re tweaking these settings.
Toggles
The bold toggle settings below are enabled by default.
| Toggle | Description |
|---|---|
| Always Map Caves | Whether to map caves below you when you’re on the surface |
| Always Map Surface | Whether to map the surface above you when you’re in caves |
| Blend Foliage | Whether to apply biome colours to foliage |
| Blend Grass | Whether to apply biome colours to grass |
| Blend Water | Whether to apply biome colours to water |
| Ignore Glass Ceilings | Whether to remain in surface mode when under a glass ceiling |
| Map Topography | Whether to generate a contour map that shows elevation |
| Show Bathymetry | Whether to show underwater terrain on the map |
| Show Crops | Whether to show crops on the map |
| Show Plant Shadows | Whether to plants and crops should cast shadows on the map |
| Show Plants | Whether to show plants on the map |
| Show Surface Above Caves | Whether to show a dimmed view of the surface when in cave mode |
| Use Antialiasing | Whether to use anti-aliasing to improve the shading effect used to show elevation |
| Use Cave Lighting | Whether to show lights undergroun - disable for a fully bright map |
| Use Transparency | Whether transparent blocks should reveal what’s below them on the map |
Other Settings
The default option for each setting below is marked with bold text.
| Setting | Options | Description |
|---|---|---|
| Reveal Shape |
|
Whether to reveal chunks in a circle or square - circle reveals show fewer chunks at once, and so perform better |
| Render Delay | Range: 0 - 10 (in seconds, default: 2) | How often JourneyMap should try to render the chunks around you - Higher values can result in better performance, but may result in chunks being missed when travelling at high speed |
| Cave Max Distance | Range: 1 - 32 (in chunks, default: 3) | The maximum distance within which to attempt to render the map while in a cave - if you set this higher than your render distance, then this will use that instead |
| Surface Max Distance | Range: 1 - 32 (in chunks, default: 7) | The maximum distance within which to attempt to render the map while above ground - if you set this higher than your render distance, then this will use that instead |
Advanced Settings
This section contains advanced settings for power users and those that may wish to tweak some of JourneyMap’s internals.
Warning
The settings in this section cam have extreme effects on the performance of your client. We don’t recommend touching these settings unless you have a good understanding of what you’re doing, or you’re directed to do so by a member of the JourneyMap support staff.
If tweaking these settings crashes your client or causes your computer to lag horribly, don’t say we didn’t warn you.

Toggles
The bold toggle settings below are enabled by default.
| Toggle | Description |
|---|---|
| Announce Mod | Whether to announce in chat when JourneyMap is ready to use |
| Check for Mod Updates | Whether JourneyMap should check for updates on Curse |
| Hide Sneaking Entities | Whether sneaking/crouching creatures should be hidden |
| High Display Quality | Uncheck to improve zoom performance and memory usage, but reduce display quality and lower performance of minimap rotation when set to “My Heading” |
| Record Cache Statistics | This is intended for beta testers - enable to record statistics for each cache |
Other Settings
The default option for each setting below is marked with bold text.
| Setting | Options | Description |
|---|---|---|
| Logging Level |
|
Set how verbose JourneyMap’s logs are, but note that some log levels can cause serious performance problems |
| AutoMap Poll Frequency | Range: 500 - 10000 (in ms, default: 2000) | Delay between automap region tasks - lower values will make the map generate faster, but will cause significant performance drops while mapping |
| Browser Poll | Range: 1000 - 10000 (in ms, default: 2000) | This setting isn’t currently implemented and may be removed in a later version of JourneyMap |
| Cache Animals | Range: 1000 - 10000 (in ms, default: 3100) | How long radar data for animals is cached for - lower values will impact performance |
| Cache Mobs | Range: 1000 - 10000 (in ms, default: 3000) | How long radar data for mobs is cached for - lower values will impact performance |
| Cache Player | Range: 500 - 2000 (in ms, default: 1000) | How long data for your character is cached for - lower values will impact performance |
| Cache Players | Range: 1000 - 10000 (in ms, default: 2000) | How long radar data for other players is cached for - lower values will impact performance |
| Cache Villagers | Range: 1000 - 10000 (in ms, default: 2200) | How long radar data for villagers is cached for - lower values will impact performance |
| Map Tile Render Type | Range: 1 - 4 | Change rendering strategy for map tiles if they appear blurry on your video card:
|
| Maximum Animals | Range: 1 - 128 (default: 32) | Maximum number of animals displayed on the radar |
| Maximum Mobs | Range: 1 - 128 (default: 32) | Maximum number of mobs displayed on the radar |
| Maximum Players | Range: 1 - 128 (default: 32) | Maximum number of players displayed on the radar |
| Maximum Villagers | Range: 1 - 128 (default: 32) | Maximum number of villagers displayed on the radar |
| Radar Range Lateral | Range: 16 - 512 (in blocks, default: 64) | Lateral distance to search for entities to display on the radar - high values will cause a significant performance hit |
| Radar Range Vertical | Range: 8 - 256 (in blocks, default: 16) | Vertical distance to search for entities to display on the radar - high values will cause a significant performance hit |